amr sounds in 3gp videos

well ubuntu out of the box doesn’t support amr sounds often found in mobile phone videos. the problem is that ffmpeg isn’t compiled with amr support… medibuntu has a version compiled with amr support, so….

add a medibuntu repository file:
sudo wget http://www.medibuntu.org/sources.list.d/hardy.list -O /etc/apt/sources.list.d/medibuntu.list

this creates a new source list in the sources.list.d folder and leaves your main source file unchanged.

then also add the GPG key:
sudo apt-get update && sudo apt-get install medibuntu-keyring && sudo apt-get update

this is also described on the medibuntu page.

you should get an update notice and if not it should be sufficient to update the libavcodec1d (ffmpeg codec library).

now your mobile phone 3gp videos should play with sounds.

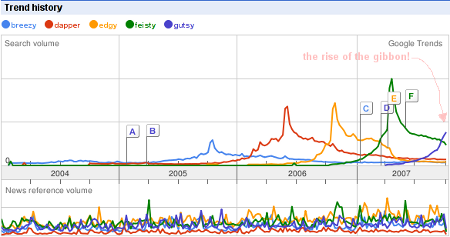
from firefox to epiphany/gecko to epiphany/webkit

since firefox is getting slower each day the developers code. i started using epiphany instead.

it has some cool features like the “Smart Bookmarks” which i have configured to be some sites in my toolbar that i can directly enter the search term. in the bottom screenshot you see an example wikipedia search and how it is set up. smart bookmarks are even smarter though, check out some samples they have on the galeon website.

smart bookmarks

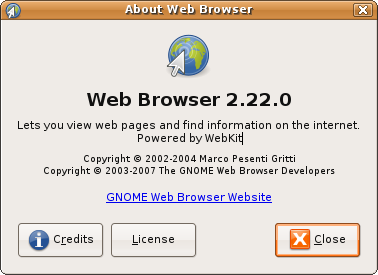
since the gecko engine has gradually made me sicker and sicker i decided to recompile my epiphany browser with webkit. woohoo! so i followed the howto here.

after installing libxslt-dev and the gstreamer development packages (libgstreamer-plugins-base0.10-dev and libgstreamer0.10-dev) which solved my dependency problems i compiled WebKit/GTK+ from the svn source with the option –enable-video just for the heck of it.

running the very simple browser found under ./Programs/GtkLauncher i receive the user agent
Mozilla/5.0 (X11; U; Linux i686; en-us) AppleWebKit/525.1+ (KHTML, like Gecko, Safari/525.1+) lt-GtkLauncher

webkit gtklauncher

to fix the glib requirement version >= 2.15.6 i just installed glib from the hardy repositories. then compiled epiphany with the option –with-engine=webkit.

now if i check the user agent i get:
Mozilla/5.0 (X11; U; Linux i686; en-us) AppleWebKit/525.1+ (KHTML, like Gecko, Safari/525.1+) epiphany

and i’m finishing this post right here with epiphany/webkit.

about

a fun little experiment but it seems it’s just not ready to actually use on a everyday surfing basis!
some things that don’t work:

  • gmail (i’m guessing because of redirects)
  • http authorization
  • flash content (no youtube browsing)
  • secure http connections
  • and it has bugs in various form fields

ace archives and unace-nonfree

well you’ve gotta love ace archives, there’s actually still people using it ;)
i received one today and wenn trying to unace in my linux i get (with t as parameter to verify the archive):
munzli@freddy:~$ unace t archive.ace
UNACE v1.2 public version

Processing archive: archive.ace

Authenticity Verification:
created on 31.3.2002 by Laudahn

thefirstfile.txt
 Analyzing
File compressed with unknown method. Decompression not possible.

Error occurred

well after searching around i found out that there is a nonfree version of unace. how handy. it’s located in the multiverse repository of gutsy and can be installed with:
sudo apt-get install unace-nonfree

now you’ve got the unace version that will decompress my archive and another version named “unace-free”. i’m not sure why they named it the other Moneygram fees way around in the repos, but it works…

iconv script for converting character encodings

well the whole character encoding problems in the german language with utf-8 and iso-8859-1 is pretty tedious. a fine little program called iconv does the whole encoding changes pretty nicely but… (well there had to be a but huh?) you can’t switch encodings with input and output being the same file.
so moving/deleting/renaming makes it a little painfull.

i wrote a little script that does this for me, it’s really simple but simplifies everything.

#!/bin/bash
#
# Convert arguments handle different encodings
iconv -f $1 -t $2 "$3" -o "$3-new"
# Create backup
mv "$3" "$3~"
mv "$3-new" "$3"

i called it “econv” and instead of:
iconv -f iso-8859-1 -t utf-8 myfile.txt -o myfile_new.txt

then deleting the old file and renaming the new one, i just type:
econv iso-8859-1 utf-8 myfile.txt

which does the trick and even creates a “myfile.txt~” backup of the original.

put the script in your /usr/local/bin or whatever you prefer and you can use it globally.

using pictures for picasa and flickr that include geotag exif data

just received a picture that has geotag information in it. the only problem is: it seems that geotag isn’t equal geotag. the picture has GPSVersionID, GPSLongitudeRef and GPSLongitude tag in the exif data like it’s supposed to.
uploading this to flickr worked perfectly, it displays the town name and location where it was taken. pretty cool if you ask me. here’s an example:
geotaged flickr image

well now to the big problem, google picasa doesn’t understand this kind of geotag… how to fix this? well i found out that exiftool knows all kinds of cool exif data and can also rewrite them. what we need to do is change the GPSVersionID from “2.2.0.0” to “0.0.2.2”. GPSVersionID 2.2.0.0 is the default and basically means that it’s version 2.2, it seems that picasa doesn’t think so and wants it to be 0.0.2.2 (which seems to be more logical for a 2.2 version but i don’t really know who’s right here).

well what you can do is install exiftool, under debian/ubuntu that would mean:
sudo apt-get install libimage-exiftool-perl and for all you windows users you’ll have to download the zip file from the site mentioned above.

now all you need to do is rewrite the exif tag, to do this for a whole folder you’d use:
exiftool -GPSVersionID=0.0.2.2 -overwrite_original imagepath/*.jpg

then exiftool tells you how many images have been updated.

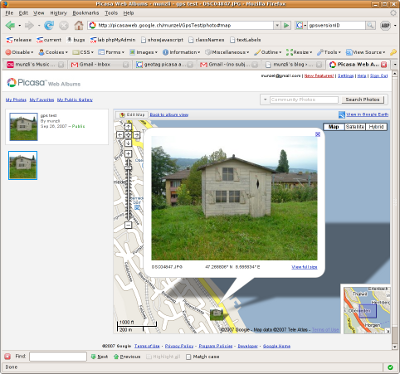
now let’s login to picasa and see what happens… after i uploaded the picture i went into the album and the picture is nicely placed on the map:
geotaged picasa image

no need to pick out the location or anything!

here’s my link to the picasa test and the flickr test.

only thing missing now is a GPS system :)

[update] for all you german users, if google isn’t set to english you won’t be able to see the map stuff on picasa because it’s english only atm.

[update2] i also noticed that there’s no need to change the exif GPSVersionID anymore for picasa to place the photo… nice…

coloring fg baja rims

well here’s something totally different that i thought i’d post about.

how to get you r/c rims, in my case my new baja rims from fg, colored in the color you’d like instead of the plain old white.

all you need to do is buy some textile coloring. the normal kind that you can buy in the drugstore, just make sure it’s suitable for acetate/nylon/polyamid.

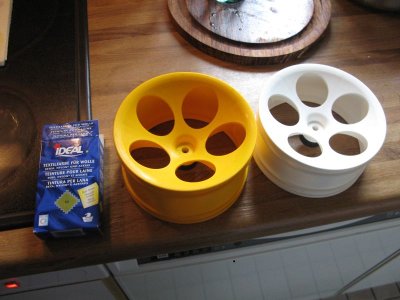
i bought some yellow coloring from ideal. i’ve seen others do it with simplicol but i couldn’t find that stuff around here.

first things first, get your rims nice and clean. grease on the rims could lead to uneven coloring.
then get a big enough pot for the rims to fit in. i didn’t have one, so i just took one that would accompany one rim at a time in the hopes of getting them all about the same color.

heat up some water, nice and close to the boiling point and then mix in one bag of textile coloring (mine was the kind without the fixation salt which will also work). make sure the water doesn’t boil (i’d say around 60-80° celcius is good) and throw in your rims. which would look like this.
cooking the rims

i let mine in there for exactly 25 minutes then cleaned it off and voila
one rim finished

now on to the next one.
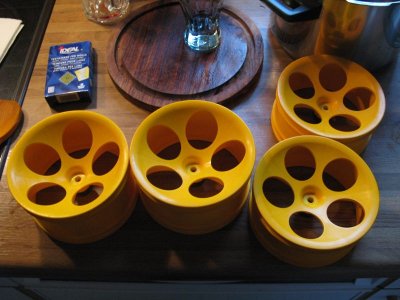
i used a timer to get exactly another 25 minutes. turns out i had to lay it back in for another minute to get the same color tone as the first one. after doing this for all four here’s what they look like
finished rims

cool, i didn’t know exactly what color would actually come out but orange is great, like the baja prototype.

here’s the wheels mounted
fg baja

another fun experiment that turned out better than expected…

resize a directory full of images using imagemagick

people wo have image galleries on the net know that the images that come from your digital camera are usually to big. even gallery scripts that do resize the images might fall into a timeout when uploading alot of images. i used to batch resize my images with a GIMP script, but why? i don’t know. using imagemagick is ten times simpler!

mogrify -resize 800x600 "*" *.jpg

easiest possible way to go…
and with the option -quality you can also set the quality… check out the mogrify man page for more information.

canon g7 fun…

playing around with my canon g7 again… from 4am ’til about 6:30am we went out on friday night (saturday morning would be more correct) and shot about everything possible…

we had more fun than a barrel of monkey with just a lighter and some long time exposures!
long time exposure

like mentioned in my old post this is not an SLR camera, but it’s macro abilities and everything up to exposure times are amazing!

wcmsblog for phpwcms 1.3.3

well i’ve seen lot’s of people having problems with this and since i’m setting up a new phpwcms 1.3.3 and need blog support i’ll describe how i’m getting wcmsblog to run.

well after downloading from the site, looked at the contents of the archive. this includes:
include/
phpwcms_template/
scripts/
blogrss.php

the include directory and blogrss.php file can be moved into your phpwcms without any worries. notice that the new default directory for the templates does not have the “phpwcms_” prefix anymore! so move the containing files into the template folder of phpwcms.
now, i don’t like the idea of having even more javascripts laying around than there already are, but for making this easy, just copy the scripts folder with moo.fx and prototype over too. (i might change this since prototype and libraries similar to moo.fx are already laying around in phpwcms 1.3.3)

well on to the next step, now open phpwcms.php and at line 96 look for
case "modules": //modules

at line 105-106 the part for the graphical text mod is done, right below this add
$subnav .= subnavtext("Blogs", "phpwcms.php?do=modules&p=6", $p, "6", 0);
make sure you don’t have another module using the ID 6 or else change it.

and around line 403 ( since you’ve added a line or two it could be around 405 ;) ) after the graphical text mod part (ca. 408-410) add
if ($p == 6) { // Blog MOD
include_once "./include/inc_module/mod_blogs/main.inc.php";
}

NOTE: that the ID has to be the same as above if you changed it.

now if you log into phpwcms under modules you have a working version of the wcmsblog backend, hopefully!
the database is created the first time you enter the “Blogs” module.

if you are not using the GT mod, make sure you open the file blog.module.php in template/inc_script/frontend_render and look for
$s = preg_replace('/\{GT:(.+?)\}(.*?)\{\/GT\}/ei', "get_gt_by_style(\$gt, \"\$1\", \"\$2\")", $s); this should be around line 215.

here replace the line with an “if” to check if the gt mod classes exist, like this
if(class_exists('get_gt_by_style')) {
$s = preg_replace('/\{GT:(.+?)\}(.*?)\{\/GT\}/ei', "get_gt_by_style(\$gt, \"\$1\", \"\$2\")", $s);
}

if your GT mod is enabled and in use (added fonts and writable gt folder for images) you shouldn’t need to do this, but it’s needed if you don’t use the GT mod, just enabling in the config file doesn’t work!

now add the replacement tag to an article {BLOG:yourblogname} and it should show up in the frontend!

i’ll be showing you how to get the captcha working soon… if you have question feel free to ask!