reset/shutdown with the NESPi case reset button

got myself a NESPi case (an awesome case btw!) and after noticing that the reset button just cuts the main power i wanted a correct shutdown/restart solution.

with a bit of code, some soldering and 2 resistors it’s actually quite simple to get going.

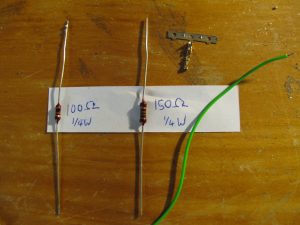
first off you need a 150 ohm ¼ watt resistor, a 100 ohm ¼ watt resistor, a bit of stranded wire and a 2.54mm female crimp jumper terminal connector (or a pi GPIO single female connector cable).

remove the top hub with the 2 usb ports and the ethernet port from the NESPi case so that you can reach the circuit with the buttons.

since the GPIO (general purpose input/output) pins on the raspberry pi can only handle 3.3 volts and the usb power on the reset button is 5V, we’ll need a simple voltage divider.

so if Vout = Vin(R2/(R1+R2)) then in our example we’d have 3V = 5V(150R/(100R+150R)) which will work great.

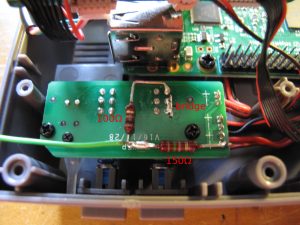
since we want the raspberry pi to always receive power even if the reset button is pressed a small bridge is needed. solder together the pins which are connected while the reset button is not pressed. check the image for more detail.
placing the two resistors in series will divide the voltage and we can use the 3 volts to pass onto a GPIO pin.

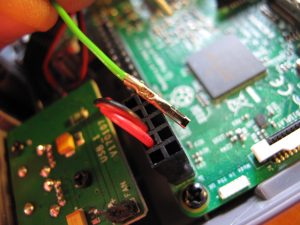
if that’s done we can hook up the jumper terminal connector to the GPIO board.
i used pin nr 5, if you change this you need to make sure your script is correct aswell.

if that’s all done let’s boot up the pi and get the scripts going.

download this script from github.

sudo mkdir /opt/scripts && sudo wget -nv -O /opt/scripts/piboot.py  https://raw.githubusercontent.com/munzli/pi/master/piboot.py

this creates and downloads to /opt/scripts/.

this script will wait for an interrupt on pin 5 and checks how long the “button” was pressed. it restarts with a short press and if held longer than 3 seconds it shuts down.

make sure you have the gpio python librarys installed

sudo apt-get -y update
sudo apt-get install --yes python-rpi.gpio python3-rpi.gpio

if you’d like to try it just call it with python (optional)

sudo python /opt/scripts/piboot.py

to get this to autostart on your pi we can use systemd.
download this file and save it to /etc/systemd/system.

sudo wget -nv -O /etc/systemd/system/piboot.service https://raw.githubusercontent.com/munzli/pi/master/piboot.service

now enable and run the service

sudo systemctl enable piboot.service
sudo systemctl start piboot.service

use systemctl to check if it’s up and running and test your reset button!

thx to ETA PRIME for the inspiration…

[edit]updated commands to fetch and save scripts, just copy/paste

cue/flac file splitting

i received a lossless CD that was encoded in FLAC with a cue file. which means it’s one big file and since my old MP3 player does understand FLAC i still wasn’t able to play one song out of many because cue files aren’t supported.

here’s how you can split them into seperate files

install shntool and flac cli tools

sudo apt-get install shntool flac

then just use cat and shnsplit to split the file and create correct file names:

cat file.cue | shnsplit -o flac -t "%n-%t" file.flac

this will output the tracks as “tracknumber-trackname.flac”

if you also install vorbis-tools you can easily create ogg files almost the same way

cat file.cue | shnsplit -o "cust ext=ogg oggenc -q 6 -o %f -" -t "%n-%t" file.flac

(using a quality setting of 6)

and at last create the tags for the files like this

cuetag file.cue *.flac

or

cuetag file.cue *.ogg

respectively

multilang MIUI 6 Special Edition 4.4 for Xiaomi Mi 2/2S Flashing via Linux

for everybody that owns a Xiaomi Mi2S and doesn’t have access to a windows box and the MiPhone flash tool, flashing the kitkat miui v6 rom through fastboot is quite easy.

first install fastboot either through the android sdk or if you’re running a debian based distro:

sudo apt-get install android-tools-fastboot

power off you’re phone and enter fastboot mode with volume down + power

i preferred running the next steps with root so i just used

sudo -i

so i wouldn’t always have to run everything with sudo.

now check if your phone is visible with

fastboot devices

if you see a device and number you’re ready to go.

download the new rom from here and unpack the archive. here’s a link to the thread containing more information.

in there you’ve got some batch files, shell scripts and a folder with all the images.

make sure the flash_all_except_storage.sh is executable and just run it. it does all the work for you.

here’s what you should see:

./flash_all_except_storage.sh
soc-id: 109
sending 'tz' (196 KB)...
OKAY [  0.017s]
writing 'tz'...
OKAY [  0.013s]
finished. total time: 0.030s
sending 'sbl1' (82 KB)...
OKAY [  0.008s]
writing 'sbl1'...
OKAY [  0.007s]
finished. total time: 0.016s
sending 'sbl2' (128 KB)...
OKAY [  0.012s]
writing 'sbl2'...
OKAY [  0.010s]
finished. total time: 0.022s
sending 'sbl3' (296 KB)...
OKAY [  0.024s]
writing 'sbl3'...
OKAY [  0.017s]
finished. total time: 0.042s
sending 'rpm' (136 KB)...
OKAY [  0.012s]
writing 'rpm'...
OKAY [  0.027s]
finished. total time: 0.039s
sending 'aboot' (1020 KB)...
OKAY [  0.081s]
writing 'aboot'...
OKAY [  0.049s]
finished. total time: 0.130s
erasing 'boot'...
OKAY [  0.011s]
finished. total time: 0.011s
sending 'misc' (8 KB)...
OKAY [  0.004s]
writing 'misc'...
OKAY [  0.003s]
finished. total time: 0.007s
sending 'modem+modem1' (51910 KB)...
OKAY [  4.067s]
writing 'modem+modem1'...
OKAY [  4.542s]
finished. total time: 8.609s
sending 'system+system1' (420865 KB)...
OKAY [ 32.988s]
writing 'system+system1'...
OKAY [ 60.549s]
finished. total time: 93.538s
sending 'cache' (32768 KB)...
OKAY [  2.578s]
writing 'cache'...
OKAY [  2.275s]
finished. total time: 4.853s
sending 'userdata' (204332 KB)...
OKAY [ 16.001s]
writing 'userdata'...
OKAY [ 11.741s]
finished. total time: 27.742s
sending 'recovery' (6640 KB)...
OKAY [  0.524s]
writing 'recovery'...
OKAY [  0.378s]
finished. total time: 0.902s
sending 'boot+boot1' (4764 KB)...
OKAY [  0.376s]
writing 'boot+boot1'...
OKAY [  1.239s]
finished. total time: 1.615s
rebooting...
 
finished. total time: 0.001s

your phone should now boot into the brand spanking new beta version of miui.
your sd card storage will not get wiped but it’s always a good idea to create a backup first.

as soon as your phone has booted you can go and locate the updater app and flash the weekly multilang rom releases from here the way you are used to.

have fun!

connect to local computer from android emulator (hosts file)

connecting to something running on your local computer from you android emulator device is something which makes debugging alot easier.

since you can’t connect to localhost or 127.0.0.1 since that is the android emulator itself we need to make sure that the hosts file contains what we need.

to make this possible you need to start your AVD with the -partition-size parameter so we can actually change the system stuff (maybe try 512 if that still doesn’t work):

emulator -avd myAVDName -partition-size 256

afterwords we need to remount the system partition to make it writable:

adb remount

since the computer running the AVD can be called through IP 10.0.2.2 we’ll create a hosts file locally for example:

127.0.0.1	localhost  
10.0.2.2	myawesomewebsite
10.0.2.2	andanothervirtualhost

now we need to push this file onto the AVD:

adb push /path/to/hosts /system/etc

and open a browser and check if http://myawesomewebsite works

woohoo!

installing steam on linux mint debian

make sure you’ve added the debian testing repositories to your /etc/apt/sources.list
deb http://ftp.debian.org/debian/ testing main contrib non-free
deb-src http://ftp.debian.org/debian/ testing main contrib non-free

update the package list
sudo apt-get update

then install equivs (this is used to create a fake jockey-common package) and realpath
sudo apt-get install equivs realpath

download the steam debian installer from here.

install the installer
sudo dpkg -i steam-debian_1.0.0.39-9-2_all.deb

then run steam-debian and then steam

it’ll update itself and you should be up and running…

android: using puk code to reset pin

well somehow after i received my new micro sim the pin code wasn’t working and i always had to block my sim (3 wrong pin inputs) and unblock it with my puk. since i didn’t know the pin i couldn’t change it either.

i found out how to change your pin using your puk, just dial this number (works in emergency call or unlocked mode):
**05*<PUK Code>*<enter a new PIN>*<confirm the new PIN>#

you should receive confirmation that the pin has been changed.

firefox crash when showing general preferences, downloads or downloading a file

had a problem recenty that downloading a file, showing the default preferences or showing the downloads dialog made firefox quit unexpectedly.
don’t know what happened or why exactly but it seems to be a problem with gnome-vfs.

my solution (so far with no side effects) is to comment this line

#file: file

ind the /etc/gnome-vfs-2.0/modules/default-modules.conf file.

bios flashing without a floppy/cd-rom/usb-stick

well i posted this in our development blog in my company and have noticed that this can be usefull for other people, but i am not responsible for anybody messing up their bios due to not knowing what they are doing!

here’s how you can flash your bios without needing a boot disk. the easy way is to use flashrom and i’ve also written a short how-to on how to boot dos from grub further below.

well installing flashrom (on ubuntu linux) is pretty unproblematic:

sudo apt-get install flashrom

just for safety create a backup of your current bios:

sudo flashrom -r bios_20101014.bin

output is something like this:

flashrom v0.9.3-r1211 on Linux 2.6.35-22-generic (i686), built with libpci 3.1.7, GCC 4.4.5, little endian
flashrom is free software, get the source code at http://www.flashrom.org
 
Calibrating delay loop... OK.
No coreboot table found.
Found chipset "Intel ICH9", enabling flash write... OK.
This chipset supports the following protocols: FWH,SPI.
Found chip "Winbond W25x80" (1024 KB, SPI) at physical address 0xfff00000.
===
Reading flash... done.

my mainboard seems to be currently untested and so i also receive this message in my output:

This flash part has status UNTESTED for operations: WRITE
The test status of this chip may have been updated in the latest development
version of flashrom. If you are running the latest development version,
please email a report to flashrom@flashrom.org if any of the above operations
work correctly for you with this flash part. Please include the flashrom output  with the additional -V option for all operations you tested (-V, -Vr,
-Vw, -VE), and mention which mainboard or programmer you tested.
Please mention your board in the subject line. Thanks for your help!

well since i’m only making a backup in this step this really is irrelevant (because i’m only reading) but i also ignored this later on and it worked perfectly.

download the bios file from the manufacturers website and then flash it:

sudo flashrom -w mynewbios.rom

here’s the output:

flashrom v0.9.3-r1211 on Linux 2.6.35-22-generic (i686), built with libpci 3.1.7, GCC 4.4.5, little endian
flashrom is free software, get the source code at http://www.flashrom.org
 
Calibrating delay loop... OK.
No coreboot table found.
Found chipset "Intel ICH9", enabling flash write... OK.
This chipset supports the following protocols: FWH,SPI.
Found chip "Winbond W25x80" (1024 KB, SPI) at physical address 0xfff00000.
===
This flash part has status UNTESTED for operations: WRITE
The test status of this chip may have been updated in the latest development
version of flashrom. If you are running the latest development version,
please email a report to flashrom@flashrom.org if any of the above operations
work correctly for you with this flash part. Please include the flashrom
output with the additional -V option for all operations you tested (-V, -Vr,
-Vw, -VE), and mention which mainboard or programmer you tested.
Please mention your board in the subject line. Thanks for your help!
Flash image seems to be a legacy BIOS. Disabling checks.
Erasing flash chip... SUCCESS.
Writing flash chip... COMPLETE.
Verifying flash... VERIFIED.

like i said i ignored the UNTESTED warning and was able to cross-flash my asus p5k-se mainboard to the asus p5kr bios (to receive ahci support for the p5k-se motherboard) without any problems.

reboot your ubuntu and set your settings in your new bios.

since i wanted ahci support i quickly checked if ahci loads properly after booting back into ubuntu linux:

lsmod | grep ahci


[alternate method]
for everybody that wants to flash using the manufacturers tool that usually only runs in DOS go for this method:

download and mount a freedos image (for example balder or freedos oem used in this example):

sudo mkdir /media/floppy
sudo mount -t vfat -o loop,quiet,umask=000 FDOEM.144 /media/floppy

now copy the bios files and your flashtool to the mounted /media/floppy (as root or with sudo).
then unmount:

sudo umount /media/floppy

move or copy the floppy image into your /boot folder

sudo mv FDOEM.144 /boot/biosupdate.img

copy memdisk to /boot (first command makes sure you have syslinux installed):

sudo apt-get install syslinux
sudo cp /usr/lib/syslinux/memdisk /boot/

now add the floppy image to your /boot/grub/menu.lst

title       bios upgrade
kernel      /boot/memdisk
initrd      /boot/biosupdate.img

then choose to boot the bios upgrade in grub while starting up (you might need to press escape to fall into the grub menu) as soon as dos is up and running use your manufacturers command in dos to flash your bios…

other methods and related topic:
http://ubuntuforums.org/showthread.php?t=318789
updating sony ericsson x10 (mini/mini pro) to android 2.1 in linux

well for all of you who like to upgrade their SE phone from a linux machine here’s a way to get it done using virtualbox… (i’m using ubuntu maverick meerkat)

first download virtualbox and install the correct version from here or for ubuntu just do a:
sudo apt-get install virtualbox-ose-qt

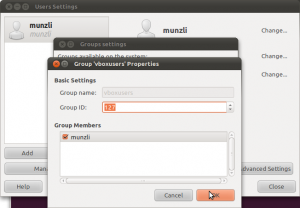
then you need to add yourself to the “vboxusers” group, this can be done using the colorful clicky menu in ubuntu by clicking System -> Administration -> Users and Groups -> Manage Groups

in older version of ubuntu and other linux distros you might need to add persmissions to usbfs for the virtualbox users. check and see if your distro has a “/proc/bus/usb” if not, ignore this next step.
edit the fstab to get the correct permission for the usb device in virtualbox

sudo gedit /etc/fstab

add this at the end (make sure you replace the XXX with the “vboxusers” group ID)

none /proc/bus/usb usbfs devgid=XXX,devmode=664 0 0

best thing to do now is a reboot ;)

so now you need to create a new virtualbox and install windows… this shouldn’t be a problem if you still have an old windows cd lying around.

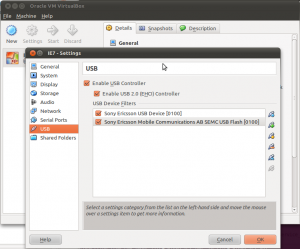
after that you need to configure that virtual machine with 2 usb filters for your phone. plug in your phone and in the virtualbox settings dialog add it to the usb filters. unplug your phone, turn it off and reboot into flash mode (hold the back key while plugin in the usb cable). now you should see a different device popup in the usb settings. add it also:

start-up your virtual machine and install pc companion or whatever and you are ready to update…